Previously, I’d written about repurposing webinar content as blog posts and articles. This time around, I want to cover repurposing the recorded webinar video to boost your lead generation. Please note that the term “old” in the title of this post doesn’t mean “outdated.” It refers to your webinars that have already occurred but are still relevant.
One way to repurpose webinar video is by posting 30- to 60-second clips of the webinar to social media platforms like Twitter, Facebook, and LinkedIn. Look for times when the audience seemed especially interested (e.g., there was an increase in comments). Or look for moments when the presenter says something that could intrigue anyone who hadn’t attended the event. Such clips can entice your followers to check out the webinar.
Email is another vehicle that can help you make the most of teaser clips. If non-attendees don’t respond to announcements of the replay being available, try emailing a video clip to show them what they missed. The video clips can also form part of a drip campaign to keep yourself top of mind with prospects while showcasing your value. Finally, a clip can illustrate a point that you make in an e-newsletter article.
You can also opt to post the entire webinar on Facebook (as long as it’s 60 minutes or less), YouTube, or LinkedIn (e.g., by embedding it as a YouTube video). You’ll have to experiment to see what works best for you.
Another idea is posting a particularly intriguing clip as a conversation prompt on social media. You can also make the most interesting parts into a five-minute summary video (maximum).
Creating Clips of Webinar Videos
Your computer likely has an editing tool such as Video Editor for Windows 10 or iMovie for Mac. Several other free options are available online. However, some will include a watermark or their logo on your video in exchange for free use. Two options that provide a generous amount of features (with no watermark/logo) are FilmoraGo and Clipchamp.
For this post, let’s assume you’re using Video Editor. Once you’re in the tool, you can work on the webinar video by following these steps:
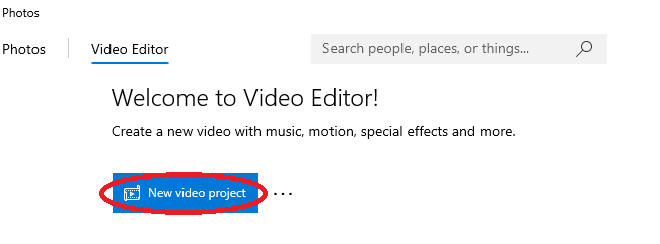
1. Click the “New Video Project” Button
Look near the top left of your screen and click the blue “New Video Project” button. You will then be prompted to name your new project.

2. Add your webinar video
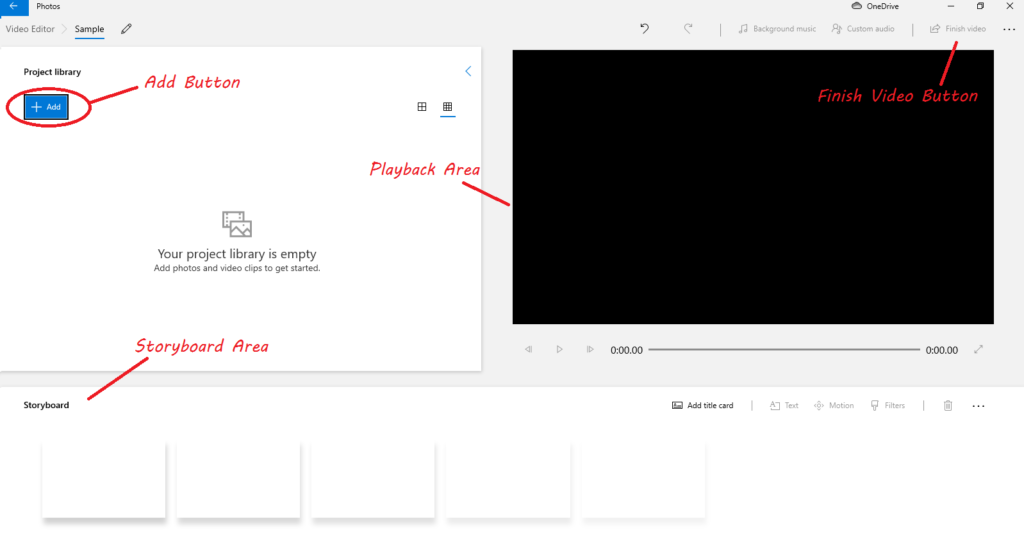
Each project workspace comes with a library area to hold the videos and photos you will be using. Click the blue “Add” button in the top left corner of the project library. It will let you upload your video from your computer or from the web. Once it is in your project library, drag the video to the storyboard in order to work on it.

3. Select and Use the Trim Tool
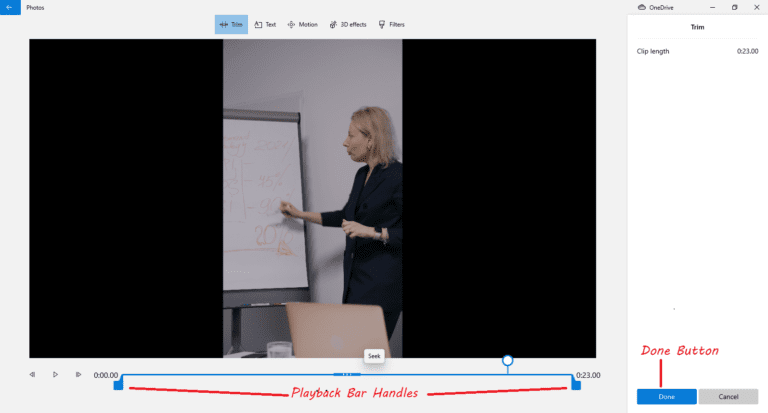
Once you drag the video to the storyboard, the trim tool option will appear under the playback area. Select the tool, and it will take the video to its specific workspace. A playback bar with handles will allow you to cut the video down to your desired clip. Once you have selected the portion of the video that you want, click the Done button. That will take you back to the general project workspace.
Note: the image below is just for demonstration purposes. So, it shows a 23-second clip even though I said the clip duration should be 30 to 60 seconds. Go with the length that you consider most effective.

Clicking the “Finish Video” option on Video Editor’s top-right menu bar (see the second image) will export the clip. The tool will automatically choose the folder that contains your original video, but you can select another destination. An untouched version of the video will remain in the project library. You can keep dragging that video to the storyboard to create more clips.
Share the clips on your business’s social media accounts such as Twitter, Instagram, and LinkedIn. Include links to the original webinar. On LinkedIn, you can post the clips on your company page. Then, have coworkers share them with their networks (which presumably include customers and potential customers).
Note: If the video clips are not of the best quality but the audio is fine, you can opt to post audio clips instead. Or you could use audio-only clips along with the video clips to further expand the content mix for your social media. You can extract audio from your video clips via Headliner’s Audiogram Wizard as well as free tools like Audacity and VLC.
When to Post Your Webinar Videos on Social Media
It’s prudent to put a little time between the live webinar and your posting of the replay or teasers. If people see them too soon after the webinar, some may decide that it’s more convenient to wait for your recording. You don’t want to train your audience to skip your live events.
So, how to keep your efforts to get new viewers from eroding your live attendance? One way is to emphasize the advantages of attending the live webinar when you’re promoting it. That could be getting the information first, your Q&A period, or a giveaway. Also, I’d suggest waiting at least two weeks before posting teasers or replays to social media. That, of course, does not include sending the replay to attendees or to people who registered but could not attend. How long the webinar content will stay “fresh” and what other content you have queued up will also factor into your decisions about when to post.
A Few Words About Captions
Including captions in your video will make them more office-friendly (people can opt not to disturb coworkers with the audio). Plus, it will make the video accessible for individuals with impaired hearing. For that reason, I recommend captioning the entire webinar rather than just the teasers.
Some platforms like Zoom include a closed captioning option that you can enable before holding the event. Of course, automatic captioning won’t be completely accurate. You’ll have to review the recording and use Zoom’s caption editing tool to correct any mistakes. If you prefer, Zoom also has an option for creating captions manually.
Facebook allows you to add captions to a video as well as make video clips. So, if you host your webinar on that social media platform, you can take care of both tasks in one place. LinkedIn allows you to include closed captioning as you upload the video.
Not all webinar platforms have a captioning option. An example of one that doesn’t (as of this writing) is GoToWebinar. If you use it, you’ll have to use a captioning service.
Conclusion
Some organizations create “trailers” for their webinars before the event occurs. The advantage of video clips of the webinars is that you can give viewers an actual taste of what occurred. It’s an opportunity to communicate the value of your webinar content. So, don’t just put that webinar footage into storage. Use it to showcase your expertise.
For more ideas for increasing the ROI of your webinar content, download my deck “15 Ideas for Repurposing Your E-Learning Webinar.”


